Saturday, March 31, 2018

Somebunny to Love

Happy Easter to all of those who will be celebrating tomorrow. Easter happens to be my favorite candy holiday. Jelly beans, marshmallow peeps, peanut butter filled easter eggs, chocolate bunnies, I could eat them all. All my little kids are now grown adults, so luckily for my waist line... we don't have much candy in our house this time of year. 

Even though bunnies and chicks are commonly found in Easter decor, I think this stamp could be used with spring or even baby themed cards. Other than Christmas stamps, I prefer to buy stamps that can be used for multiple occasions. This bunny hopped its way to a friend who had celebrated a birthday just a week shy of Easter. 


Stamps:
Good Days (Unity Stamp Company)

Paper:
Fine Linen (Papertrey Ink)
Vintage Cream (PTI)
Autumn Rose (PTI)
The Paper Studio "Country Road" (Hobby Lobby)

Ink:
Tuxedo Black (Memento)

Accessories:
Copic Sketch Markers (Jerry's Artarama)

Saturday, March 24, 2018

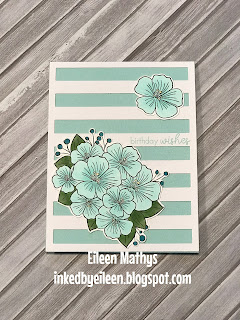
Birthday Bouquet


This week I reached for another stamp set that I have purchased and haven't used yet. This past week we "celebrated" the first official day of spring. According to the calendar spring has sprung, but if you look at my yard you would think winter is still here. The forecast looks promising for next week and I am already thinking about spring flowers. 

I picked a pretty pastel shade for my card and matched the flowers accordingly. I have been working diligently on my Copic marker skills... and I think my slow and steady method are definitely showing in the end results. The ScanNCut made quick work of cutting out the flowers shown on this card. It once again has saved me on the cost of buying matching dies for this stamp set. 


Stamps: 
Floral Bouquet (Avery Elle)
Ways to Say: Birthday (Papertrey Ink)

Paper:
Aqua Mist (PTI)
Stampers Select White (PTI)

Ink:
Tuxedo Black (Memento)
Aqua Mist (PTI)

Accessories:
CutNScan (Brother)
Cover Plate: Stripes Horizontal Die (PTI)
Copics Sketch Markers (Jerry's Artarama

Saturday, March 17, 2018

My Favorite (The Easiest) One Sheet Wonder

One of my goals for this year was to use up some of my patterned paper. In the past, a quick and easy way to use up paper was to create a One Sheet Wonder or "OSW". I have seen several patterns for this paper hack, many of them involve tricky cuts or layering. This design I happened to stumble across while looking for inspiration on Pinterest. I was seeking out creations for a stamp set... one that I had no idea why I bought, especially if I had to go to Pinterest for ideas on how to use it. Funny how it lead to me to this amazingly simple OSW. 

The best part about this, is that you really only have to remember two cuts, and this design doesn't make up a ton of cards. Granted this design makes all your cards look similar, it is the added sentiment where the difference comes in. Take six sheets of 12x12 coordinating double sided patterned paper and cut each sheet into 3"x4" pieces. Depending on which way you prefer your card orientation, make sure to cut the paper accordingly. Since you will have 12 cuts of the same design, split it into two stacks of six. You will cut one stack into 2-1/4" (saving the 3/4" scrap). You will need all three pieces to make your card. ***Please note these instructions are ideal for a standard 12 sheet pack of DSP sold by Stampin Up!

Mix and match your two larger pieces with the small scrap. I like to use the smaller piece to cover up the seam. Remember if using double sided paper to flip the sheets over to reveal the different designs. Pattern mixing can be fun, but don't let it become frustrating. As you can see below, I have mixed and matched all my pieces and will start the process of getting my cards assembled. I will leave these cards without sentiments so I will have a card ready "on the fly" for an appropriate occasion. 


Stamps:
Seaside Shore (Stampin Up)

Paper:
By the Shore DSP (SU Retired)
Calypso Coral (SU)
Very Vanilla (SU)

Ink:
Calypso Coral (SU)

Accessories:
Sizzix Big Shot (SU)
Spellbinders Petite Scalloped Ovals
Spellbinder Petite Ovals


Saturday, March 10, 2018

Butterfly Tag

This tag was created as an entry into the Unity Stamp Company's Spring Tag Challenge. I am not much of a "tag" person, so making one was really a stretch for me. In my mind a tag is something similar to a bookmark, so I set off to make something that resembled exactly that. 

When I think of spring, I think of new life. We had a brief glimpse of spring a week or so ago until the snow came back. Spring will be here soon enough and we will see all the signs of new life... birds, flowers, and one of my favorites, the butterfly. 


For this tag I once again used one of my favorite backgrounds, a page from an old library book. I cut the piece just a bit larger than my tag and tore the edges down for a distressed look. I sponged Tim Holtz Antique Linen on the paper to give it an aged appearance. Around the edges, I sponged Frayed Burlap so that the newsprint appeared to blend into the kraft colored tag. I inked up the butterfly first in the Berry Burst and then in Versamark before adding the holographic embossing powder. I think this gave the card just a touch of bling. I fussy cut the butterfly out and added a sentiment with a bold enough font to not get lost in the background. It is simply by chance that the space in the background fit with smaller text.


Stamps:
Do What We Love SMAK March 2015 Kit (Unity Stamp Company)
Never Be Afraid KOM August 2017 Kit (Unity)

Paper:
Classic Kraft (Papertrey Ink)
Vintage Cream (PTI)
Upcycled Library Book

Ink:
Antique Linen Distress Oxide (Blitsy)
Frayed Burlap Distress Oxide (Blitsy)
Berry Burst (Stampin Up)
Versamark (SU)

Accessories
Marvy Heat Tool
Ranger Holographic Embossing Powder (Simon Says Stamp)
Burlap (Michael's)


Saturday, March 3, 2018

Friends of Unity March Blog Hop

Hello and welcome to our friends of unity march blog hop. This month our theme is new beginnings. For this hop I decided to not make a card, but a gift instead. I made a covered notepad. I taught this at one of my Stampin Up workshops several years ago, and have enjoyed making these ever since. They are quick and simple to assemble, and can be made easier if you use patterned paper for the background, but for this one I CASE'd one of the design teams ideas and stamped the background.

As with any and design, sometimes the hardest part can be "what colors do I use?" Unless I am specifically making a card for a baby shower or a wedding... I tend to stay with colors that I favor. That is exactly what I did here. My favorite color is purple, but my favorite color to stamp with is blue.

Inside there is a pocket to slip a card or other small notion to your recipient. Like the card you see? Maybe you missed my blog post from last week. Check it out here for the card details.

Here are instructions for making this project:
One piece of card stock cut to 8"x11". Score this on the long side at 5-1/4" and 5-3/4". This creates your cover. Another piece of card stock cut 5"x 2". Score this on the short side at 1" and 1-1/4". This creates the cover over the top of the notepad. Be careful when gluing this one that you only glue to the top of the notepad and not the paper. The last piece of card stock is cut 6-1/2"x 4-3/4". Score one short side and both long sides at 1/2" and 3/4". You will need to cut the corners away where the scoring lines cross. This creates your pocket. As for the front... decorate that as you wish!
***FYI... I strongly suggest using a liquid glue for all portions of assembly with this project. Double sided tape, glue dots, etc simply will not hold up.

Hop along with the other Friends of Unity and see their creations. Psst... There is also a giveaway!
Eileen Mathys (You're Here)

For the project shown, here are the materials I used:

Stamps:
You Make You (Unity Stamp Company)

Paper:
Soft Suede (Stampin Up)
Crumb Cake (SU)
Vintage Creme (Papertrey Ink)

Ink:
Dapper Demin (SU)
Marina Mist (SU)
Soft Sky (SU)

Accessories:
ScanNCut (Brother)
Tombow Mono Multipurpose Liquid Glue (SU)
Notepad used is 5"x8"